





My Sticky Gadget

Wednesday, July 31, 2013

DIY Blue Tinted Mason Jars

 A few weeks ago we took a trip to the mid-west where we visited some family and while there, we drove to a small town that had all these cute old antique shops and thats where I fell in love with the blue mason jars. Now, let me just break it down in terms of $$$ as to why it's cheaper to make your own rather than going out and buying them. A blue tinted antique jar costs $10. I already had everything at home so I didn't have to spend any extra money on this project.. But if you are a crafty person you will most likely have these supplies on hand and if you don't it's probably going to cost you about $5 to make 1 or 2. You're probably thinking... How in the world do I tint glass? Well scroll down to find out.
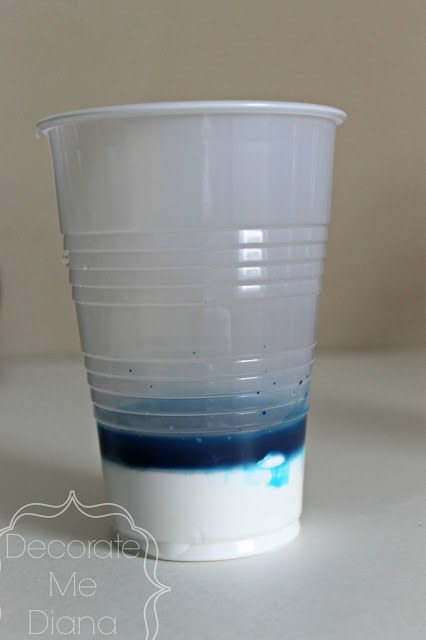
 
Start by mixing about 4 Tablespoons of MP with a few drops of blue food coloring and 1 Tablespoon of water. 
** With the food coloring you can use as much or as little as you would like.**
  
Pour the mixture into the jar and swirl around till evenly distributed.
Flip the jar over a plastic cup for about 5 mintues.
After the 5 minutes is up, flip back up, place in a cold oven and turn it on to the lowest temperature. Bake for about 20 minutes. Take out and let them cool.

You can use these jars for so any different things, such as:
  • Store cotton balls in the bathroom
  • Pen, scissor, paint brush holder in the craft room
  • Centerpieces for an even (I would not recommend using as a vase with water)
  • Candle holder
  • Store non-edible items
Have you entered my GIVEAWAY?


 photo PicMonkeybannerCollage_zps370c8a73.jpg

Pin It

Friday, July 19, 2013

Maple Hill Farm + GIVEAWAY

I had the absolute pleasure of talking to a sweet lady named Tammy who together with her family owns Maple Hill Farm where they have all sorts of fresh meats, jams & jellies, eggs and so much more. Along with all the fresh produce they offer, Tammy hand makes Organic Sheep Milk Soap and Eco-friendly Soy Candles that I had the pleasure of trying out.


The Sheep Milk Soaps are made with, of course sheep milk from Tammy's sheep along with organic coconut oil and natural essential oils and botanicals-- who wouldn't want to have these goodies in their soap?!  Each bar is handcrafted in small batches to ensure high quality and allowed to cure for a minimum of 4 weeks before they are ready to sell.
Because I am pregnant my scent of smells are on crazy mode to the point where I had to replace a lot of my cosmetics, cleaning products etc. So I decided to go with the lemongrass scent and I'm not one bit sorry I chose that because it smells so fresh and invigorating that when I felt nauseous and used the soap, the nausea went away.  And to top off the great scent and the fact that it's all natural, it left my skin feeling so soft and moisturized. See what other scents Tammy has to offer at her Etsy store.


One thing you probably didn't know about me is that I absolutely love candles and I recently learned about Eco-friendly clean burning soy candles and after trying the Maple Hill Farm candles I was sold. What are the benefits of soy candles? They burn clean, which means soy candles don't increase the CO2 levels in the air like paraffin candles do, they burn longer, and they are non-toxic. My favorite part about Tammy's candles are the different and unique scents she offers like, Strawberry Sangria, Watermelon, Honeysuckle, Blueberry Cheesecake, Strawberry Shortcake-- just listing these is making me hungry. I went with the Mango Tangerine and let me tell you, it brought me back to a breeze day at the beach in Punta Cana where John and I spent our honeymoon. The scent of this candle is amazing, let's just take a moment to image how fresh squeezed orange juice smells like mixed with sweet ripe mango... Yeah, that's what I thought. Oh but the best part is, if Tammy doesn't have a fragrance you like in her store she will take special orders! I will for sure return to her store for some sweet smelling treats. 


Giveaway! 
Because I absulutely love these products and because you guys are awesome! I decided to giveaway 2 candle jars and 2 soap bars to 4 lucky winners. 
Here are the simple rules

MUST DO AT LEAST 2 OF THE FOLLOWING:
1. Follow my blog
2. Like my Facebook page
3. Leave a comment bellow on your favorite candle scent  

** If you do all 3 you will have a higher chance of winning**
**Spammers will be blocked**

On August 8, 2013-- Using Random.org, I will take all my followers from my blog & Facebook page as well as all the comments left below to randomly select 4 winners. The first 2 winners will get to pick between the candle or soap and the remaining 2 will get whatever is left whether it's the candle or soap but all winners will be able to pick the fragrance of choice.
For a list of all the fragrances visit
 Maple Hill Farm etsy store.

ENDS 
AUGUST 8, 2013

 photo PicMonkeybannerCollage_zps370c8a73.jpg

Pin It

Monday, July 8, 2013

June Highlights + BIG News!

Talk about MIA right!? I'm still alive!! June has been a CRAZY busy month to the point where I didn't even have time to grab my camera to snap pictures of the month. I'll update you guys are the more important happenings.

Let's start off with the biggest and most exciting that happened this past month and that is..... WE ARE HAVING ANOTHER BABY!!!!! We are really happy and excited. When I first found out, I was shocked and I'll admit I cried but not because I was mad or sad but because I was nervous and I mean, I just had a baby 7 MONTHS AGO!!! But I kept telling myself, "This is what the Lord has planned for us and he knows how much John and I can handle." 

Answers to questions I have been getting:
  • Was this planned? No, not at all. But we are really excited and don't regret anything!
  • When are you due? At the end of January
  • How far apart will the kids be? 13 months
  •  Do you want a boy or a girl? Honestly, I will be happy with either a boy or a girl... Boy because Luke will have a buddy to play with. Girl because I'll get to make all sorts of bows and have a sweet mama's girl.  
  • C-section or VBAC? CS if baby goes to due date, will try a VBAC if the baby comes early.
  •  How are you feeling? I have my good days and bad days... One day I don't even feel like I'm pregnant, and the next day won't be so hot. But I do feel MUCH better than I felt with baby #1. 

My garden is doing AWESOME! Right after I posted my May Highlights I planted more veggies. Here are some pictures of my garden.


I am so happy that I actually have a garden and whenever I need veggies or herbs I just go pick it from my backyard. I love doing that.

Veggies in my garden:

Tomatoes
Mini bell peppers
Jalapeno peppers
Yellow Tabasco peppers
Habanero Peppers
Cucumbers
Yellow Summer Squash
Eggplant
Basil
Dill
Parsley
Cilantro
Rosemary

We are hoping to get a lot of jalapenos so we can make pickled peppers.

House plans for July:
We are about to start working on our basement and hope to finish by the time baby #2 arrives. Our garage is linked to our basement, so we are going to close out the garage, and make it part of the basement. I am really excited but at the same time I am dreading it just because, well.. I honestly don't really have a good reason other than the fact that it's going to be a lot of work and I just want it finished! Don't worry everyone I won't be doing any heavy lifting or do anything that is harmful to preggy ladies or the sweet little baby in my belly. I will be posting pictures as we make progress.

We are also adding 2 windows in our living room to bring in more natural light and getting rid of the bookshelves. Any ideas of where to put the bass and receiver?

 We are also going to put an opening in this wall which is between the living room and the kitchen.

 So, that's it for the month of June. I'm sure July is going to be busy but I'll have tons of projects and updates along the way. 

Have a GREAT July!!

 photo PicMonkeybannerCollage_zps370c8a73.jpg 

Pin It

Tuesday, June 18, 2013

Trash to Treasure: Old Windows

 Remember these beauties from my May post? Well, I finally got around to fixing them up. If you ever come across old windows that are made from wood don't pass them up! With a good wipe down, some sandpaper, paint & stain, you can turn trash into something beautiful. There are endless things you can use old windows for.  I used one window as my main piece of decoration to dress a mantle over a bed. Here is how I turned these old ugly windows into a cute classy rustic piece of decor.

Thursday, June 6, 2013

DIY Upholstered Headboard

 
I've had this headboard project for my guest bedroom on my to-do list for a while now and I finally gathered all my supplies to make it. As you know from my Pottery Barn Clock post that I love pretty much everything from PB. I saw this headboard on their website and I knew I could make something similar for WAY less. Theirs (with shipping) will run you about $1,000... I paid $50! Although mine is a bit thinner than the one at PB, it still looks great (in my opinion) and no one will know it was a DIY unless you tell them. 

Materials and measurements:
One plywood board- cut 5ft X 3ft
One 2X4 wood- cut 4ft long
 1" Foam-- 4 yards
Batting-- 2 yards
Fabric-- 2 yards
Upholstery Nails 7-- 24 count boxes
Spray adhesive

Tools:
Tape measure
Pencil 
Circular saw 
Staple gun
Flat head Screwdriver
Rubber hammer

Monday, June 3, 2013

May Highlights


Happy Monday everyone! The month of May for us has been a crazy busy one! We did something different every week and we got a lot of things done that we had planned to get done in this past month. I'll let the pictures tell the story.

At the very beginning of the month we did trim work on our entry, dining room, and upstairs hall way. (finished pictures coming soon). This took about a week because we did it ourselves and let me tell you... It was NOT easy!! I don't know HOW many times John had to cut and re-cut the corners and the stair part to make it look perfect. My job was to seal all the nail holes, sand, and paint-- the painting was the most time consuming because I had to apply a ton of coats to get a nice bright white and a smooth finish. But we love working and building together so in the end it was fun and we both had a blast.
 

You're probably wondering about these old, dirty, ugly, windows.
My dad found these old windows somewhere out in the country and brought them home for me to re-finish. Funny thing is, I've been looking for old windows to re-do for a very long time and never found them. (My dad knows me well.) I will have a post of these beauties very soon because I got working on them as soon as I got them.
Here is a sneak peek of my living room re-decorating. I got a new rug and some new furniture that I will show as soon as I bring them all together.
One of my big projects this month was to build a headboard for my guest bedroom. Here is a little sneak peek of that.
We planted a garden!! It's not big; but we didn't want to plant a ton of stuff and for the plants to end up dying, but it's actually doing very well! We planted tomatoes, bell peppers, cucumbers, yellow squash, and jalapenos. All the plants are growing very nicely, I will update on the progress.
This month we also celebrated my first Mother's day and John's gift to me was a fig tree that he planted for me. Now, you're probably thinking..... wow... he bought you a tree?! It was the most perfect, romantic and thoughtful gift, and here is why... I absolutely LOVE figs and I craved them more than anything while I was pregnant with Luke. I wanted to grow a fig tree but I could never find the plant to buy. But John took care of everything, he found a store that carried the tree and planted it for me as well.
 

Last and certainly not least. Here is my little peanut-- he is growing and changing so fast! I try and savour each moment with him and John. Luke is almost 6 months, we started him on solids this months and he absolutely loves food. YAY!!
 
 I hope you all have a wonderful, fun, and safe month of June!!

Projects from the month of May


  photo PicMonkeybannerCollage_zps370c8a73.jpg

Pin It

Tuesday, May 28, 2013

DIY: From Mirror to Chalk Board

 
Remember that mirror I found at a garage sale from my April post? Well, I finally got around to re-purposing it. My original plan was to re-finish it for my parents front entry, but they found something else to use and I ended up keeping the mirror. I've always wanted to make a chalk board for my quest bedroom/craft room but I never found the right shaped, sized, or priced mirror I could transform until I got this one. This project was so easy and simple to make, anyone can pull this one off. All you need is an old mirror or picture frame, paint, painters tape, and patience.