My Sticky Gadget

Tuesday, December 10, 2013

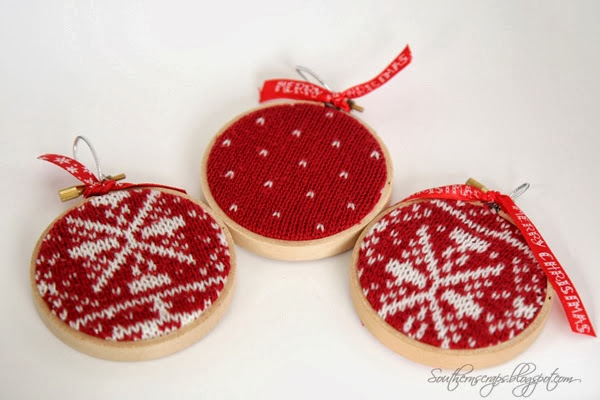
10 DIY Christmas Decorations


 Christmas time really is the most wonderful time of the year! In our family the main focus of Christmas is the birth of our Savior, Jesus Christ. We try not to get caught up in the shopping, planning, eating, and chaos of the season. Don't get me wrong, I still like to decorate the house and make Christmas treats, but since I'm 8 months pregnant this Christmas season I wasn't able to make too many things myself so here are some of my favorite crafts that I would have made.


 Merry Christmas!

 photo PicMonkeybannerCollage_zps370c8a73.jpg

Pin It

Friday, December 6, 2013

Deconstructed Christmas Wreath

After a short Thanksgiving break from blogging, I'm back with a Christmas craft! This will be my first Christmas post on the blog and I'm pretty excited about it. 
We spent Thanksgiving week with the part of our family that live in the Midwest which was a lot of fun. While we were there, two of my sister-in-laws planned this neat craft-- we made deconstructed wreaths... This isn't your traditional Christmas wreath that's for sure, but I absolutely love how they turned out and as always this is a very easy craft to put together.  

    
 We started off with a variety of pretty ribbon and different ornaments.
 I decided to make a more rustic piece so I grabbed some burlap and red ribbon to start my bow.
 I used the same technique to make my bow as I did for my *fall wreath*
1. Cut both ribbons the same size.
2. Bring both ends towards the middle and bind together with a hot glue gun. 
3. Pinch in the middle. 
4. Secure with floral wire.


 Tie a few pieces of twine in the middle of the bow. I made mine different sizes to give it dimension. 

 After you have your twine tied, it's time to add a center to the bow. I chose to make a cluster of mini pine cones, cinnamon sticks, and berries for the center of my bow by gluing them together with a hot glue gun.
  

 After the center was finished I tied one ornament to the end of each twine and glued clusters on the top of each ornament to match the center of the bow.

 
 This is how mine turned out.

 SIL #1's wreath... she went with the classy red and gold colors which turned out very pretty. 

 SIL #2's wreath... She went with the fun festive red and green colors! 

All 3 wreaths turned out very cute and we had a blast making them. 

What's your favorite Christmas craft?

 photo PicMonkeybannerCollage_zps370c8a73.jpg

Pin It

Friday, November 8, 2013

Rosemary Garlic Bread

 My mom is a fantastic baker. She makes everything from melt-in-your-mouth desserts to fresh buttery baked bread.-- she even made my wedding cake! I surprised myself the other day and decided to make bread. Since my garden is full of rosemary, I went with baking a delicious loaf of rosemary garlic bread. (Thanks to my mom for all the tips since I've never baked bread before.)
I was so surprised when I took the first bite, it was soft, moist, perfectly seasoned! This type of bread pairs perfectly with a little butter and pinch of salt on top.


Some of the loafs my mom baked a few days ago.  


 Rosemary Garlic Bread 

1 cup warm water
1 Tbsp. sugar
2 tsp. active dry yeast
1 tsp. salt
2 Tbsp. fresh rosemary, chopped + a little extra for sprinkling on top
1/2 tsp. garlic powder
1/4 tsp. fresh ground pepper
2 Tbsp. olive oil
1/2 cup whole wheat flour
1 1/2 cups white flour 
a handfull of corn meal 

Egg wash
1 egg whisked
1 Tbsp. water

 In a large bowl, combine warm water, sugar, and yeast. Let it sit for 10 minutes to activate the yeast. 
Stir in the salt, rosemary, garlic powder, pepper, olive oil, and whole wheat flour. Add the white flour and stir until the dough forms into a ball. Knead on a floured surface for about 5 minutes. Add more flour to prevent sticking, the dough should be smooth. Place the dough in a large lightly greased bowl, cover, and let it rise for 1 hour. 
After 1 hour, punch the dough down and form into a ball. Place onto parchment paper that is lightly dusted with corn meal, cover, and let it rest for 45 minutes.
Meanwhile, preheat oven and pizza stone to 400 F. After 45 minutes, carefully place the dough on the hot pizza pan and lightly brush with egg wash and sprinkle with chopped rosemary. Bake for 25 minutes, until top is golden brown.

(This is a modified recipe. Original recipe adapted from All Recipes)

 photo PicMonkeybannerCollage_zps370c8a73.jpg

Pin It

Wednesday, October 30, 2013

From Scrap Wood to Sign Tutorial

I have a huge bin of wood left from old projects and I try to use every piece of wood I can in some way. I was left with some random pieces of thin wood from my entryway bench John built for me and I thought I would make a small sign to display in my little man's room. Here is how it turned out...It's very simple to make and guess what? I had all the materials on hand so it only cost me a few pennies to make. (FREE)

Friday, October 25, 2013

Molten Chocolate Cake

I am a huge fan of chocolate, especially chocolate cake. One day this week I really wanted a good moist chocolate cake, I but didn't want to make a big fancy cake, I wanted something quick and easy. These cute chocolaty treats take 25 minutes to make from start to first bite. 
{Gluten-Free}
Molten Chocolate Cake

1/2 cup chocolate chips*
1/2 cup butter
3 egg yolks
1/4 cup sugar
3 egg whites
4 ramekins
1 tbsp confectioners sugar (for garnish) 

Preheat oven to 400F. Lightly grease the ramekins with butter, and set aside. Melt chocolate in the butter in a double boiler, set aside to cool for 5 minutes. Beat egg yolks and sugar then mix into the melted chocolate. Beat egg whites in a bowl until they form soft peaks. Fold the chocolate into the egg whites. Pour batter into the ramekins and bake for 7- 9 minutes. The outside of the cakes will be set and possibly crack but the inside will be moist and liquidity. 
Let them cool for a couple minutes, sprinkle with conf. sugar, and dig in with a spoon.

These cups of chocolate cake can be served with ice cream, fresh berries, or whip cream.

*You can use semi-sweet or dark chocolate. I prefer milk chocolate and that's what I used.


What's your favorite chocolate dessert?

 photo PicMonkeybannerCollage_zps370c8a73.jpg

Pin It

Thursday, October 24, 2013

Moonlight & Mason Jars Link Party #28

I am so excited to be a part of Moonlight & Mason Jars this week! Thank you Jennifer, Heather, and Ashley! 

Moonlight and Mason Jars Link Party Button

Thursday, October 17, 2013

DIY Nautical Mirror


A few weeks ago I was shopping in Pottery Barn outlet. I noticed an amazing mirror and thought to myself, "Surely I can make something similar to this", and I did. I decorated my son's room with accessories that are nautical and this mirror is a perfect fit in his room.

Tuesday, October 1, 2013

Bacon & Cheddar Stuffed Zucchini

Did I have you at Bacon? I hope I did because these stuffed zucchini boats were a Huge hit in my house. They are really simple to make and most of all very delicious, not to mention the $$ for this dish is very friendly on your wallet. Oh and did I mention it's a gluten-free dish?

Thursday, September 19, 2013

DIY Fall Wreath Tutorial

 
Pumpkin spice latte is back at Starbucks, the leaves are starting to change color, and it is time to change the wreath on my door. I came across this beautiful wreath by Home Sweet Ruby. I just loved the wheat and big bow combo, but I wanted to put my own touch to this fall wreath so, this is what I came up with.

Thursday, September 12, 2013

Easy Caprese Salad

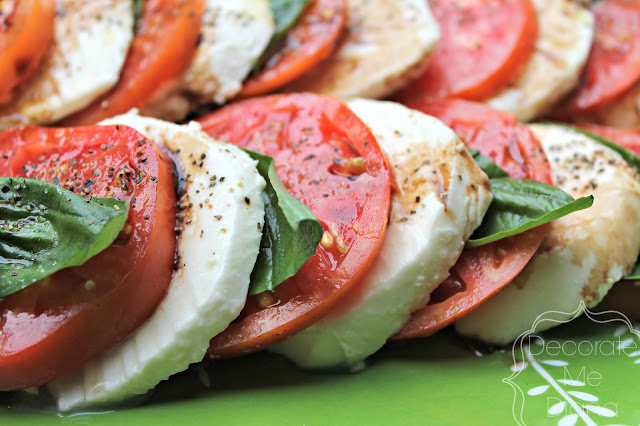
I am a huge fan of simple and easy salads... I mean who isn't? I had Caprese salad a few years ago when my sister-in-law made it for John and I's engagement party, and I fell in love with it!  It's so fresh and simple, yet sophisticated looking at the same time, and the combination of mozzarella cheese with the sweetness of the tomatoes and aromatic basil literally creates an Italian party in your mouth! Since my garden is overflowing with basil and tomatoes I decided to whip up this quick and easy salad.

Caprese Salad 

3 medium to large tomatoes

Fresh mozzarella (I used 4 medium balls)

1/4 cup basil

 4 teaspoons balsamic vinegar

 1 tablespoon olive oil

Salt & Pepper, to taste

 Slice cheese and tomatoes approximately 1/4 inch thick

Arrange on a platter to your liking (i.e. tomato, basil leaf, cheese)

Drizzle with olive oil and balsamic vinegar. Season with salt & pepper to taste.

 photo PicMonkeybannerCollage_zps370c8a73.jpg

Pin It

Friday, September 6, 2013

Nautical Sign {DIY}

One of my favorite type of projects --besides re-purposing furniture, is to make signs. Whether they are from new wood or pallets, I love to make them! There is something really unique and special about having meaningful signs around your house and they are even more meaningful when you make them yourself.  This particular sign was for my son's room, which I made to hang over his crib. I made it from new wood which I glued together, painted, and distressed. Before I get started with the steps I will say this,  if you are brand new to DIY.. this project will require some help to make for a few reasons...

Tuesday, August 27, 2013

Ultimate No Bake Cookies

 My friend Emily and her husband owned a coffee shop in Colorado where they had all sorts of healthy, delicious, homemade goodies and these cookies were one among all the other treats. Now, I have to be honest and say that I am not a huge fan of no bake desserts BUT these cookies completely changed my opinion on no bake sweets. They are packed with really healthy stuff like almond butter, oats, chia seeds and sweet honey. When Emily gave me the recipe I didn't have all the ingredients so I substituted some things but no worries I will give you both recipes because I made the original as well and it was simply divine. Here is my version:

Ultimate No Bake Cookies

1 cup oats
1/2 cup almond butter
1/4 cup coconut
1/4 cup honey
2 tablespoons chia seeds
1/4 cup semisweet chocolate chips
Mix, form into balls, & ENJOY! 


Emily's recipe:

1 cup oats
1/2 cup peanut butter 
1/4 cup coconut 
1/4 cup honey
2 tablespoons chia seeds
2 tablespoons sesame seeds
1/4 cup dark chocolate chips/cocoa nibs
Mix, form into balls, flatten & enjoy!

You can get really creative and use dried cranberries, cocoa powder, sprinkle of sea salt-- the list is endless. Give these little guys a try you will be SOLD!


 photo PicMonkeybannerCollage_zps370c8a73.jpg

Pin It